Fixing thingsCovid itself was pretty uneventful with very low fever and a sore throat (thanks to the Omicron variant being a lot milder than the Delta variant) but two weeks after the onset of symptoms I ended up developing a pulmonary embolism as a complication of covid mixed with prolonged physical inactivity. This basically put me out of commission for the entire month of February.
Anyway, once I was back on my feet and feeling good again, I went back to work on the new system (by now I had already replaced the 32GB of ADATA XPG DDR5 RAM with the 64GB of Corsair Dominator Platinum DIMMS).
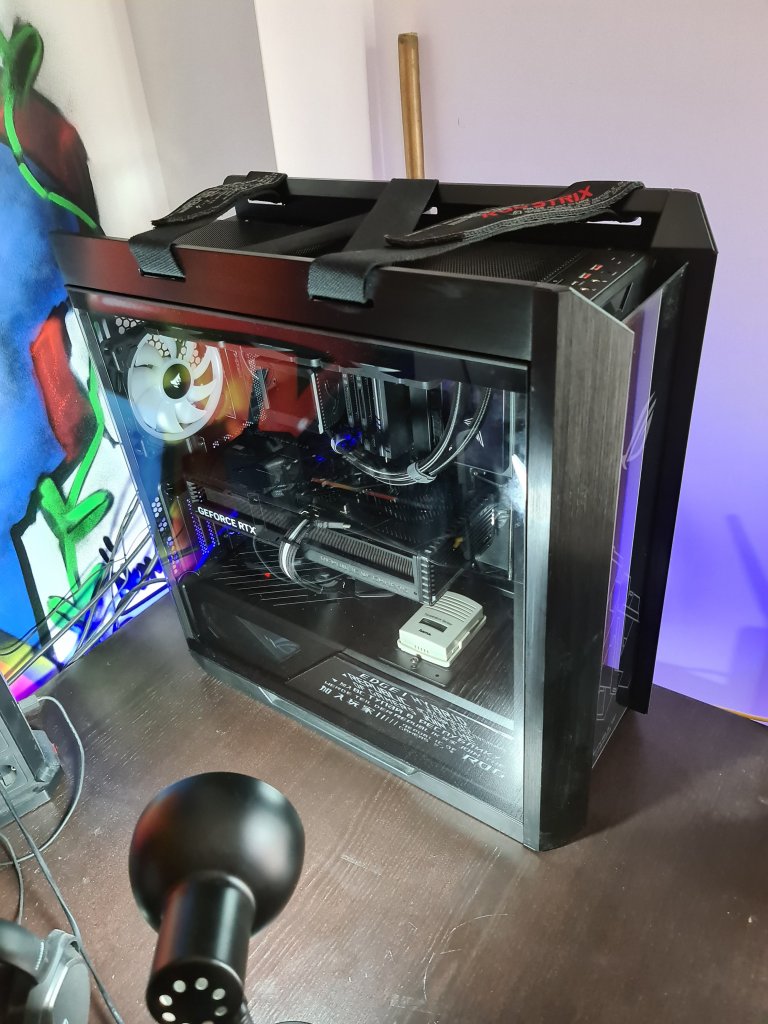
I wanted to move the T-FORCE SATA SSD from the back of the case (where it had little to no airflow) to the front of the case (using double sided tape if necessary) and I still hadn't given up on the idea of putting the 3090 in a vertical orientation.
This time I removed the Helios cable cover/GPU holder, and figured out I could actually screw either the left or the right side of the SATA SSD to the holes originally intended for the Asus fan/RGB Hub, so that all that nice RGB would not go to waste.

I also removed the white outdoor thermometer I had double sided taped to the cover and moved it to the PSU cover instead.

With a needle and lots of patience I slowly straightened the bent pins on the two motherboard USB 3.x connectors. With the cable cover removed I was now able to plug the straight cable directly to the motherboard without bending any pins, but the L shaped cable still interfered with the GPU despite being connected to the second (lower) port. This is where one of the USB 3.0 extender cables I had ordered from Amazon still came in handy.

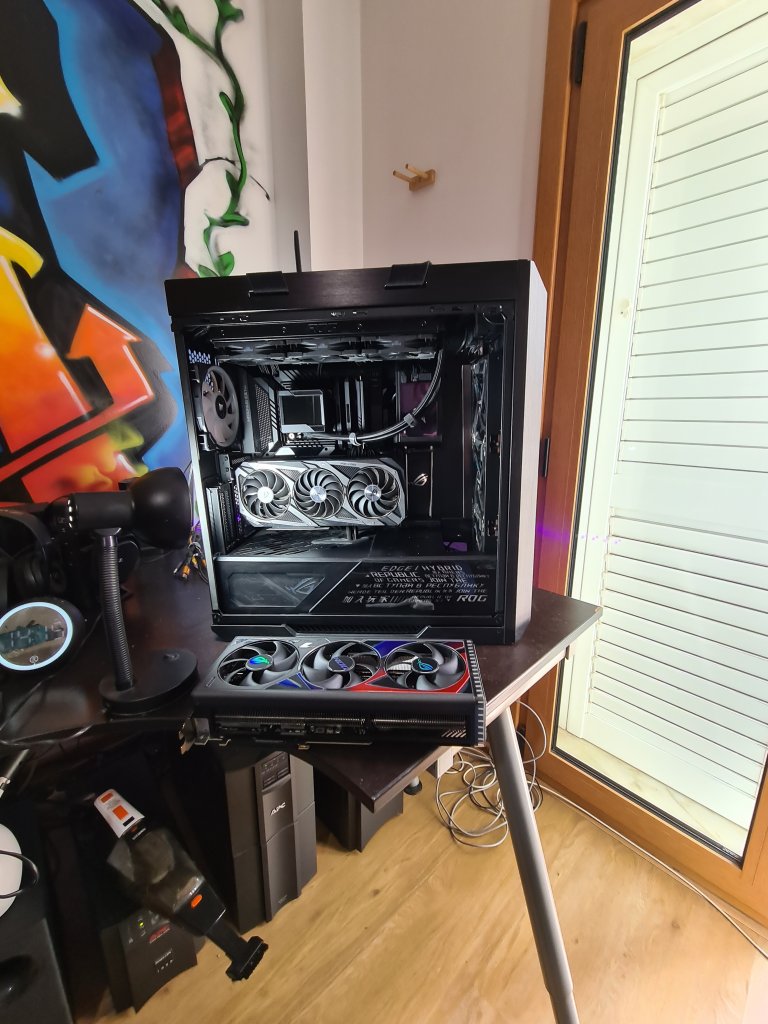
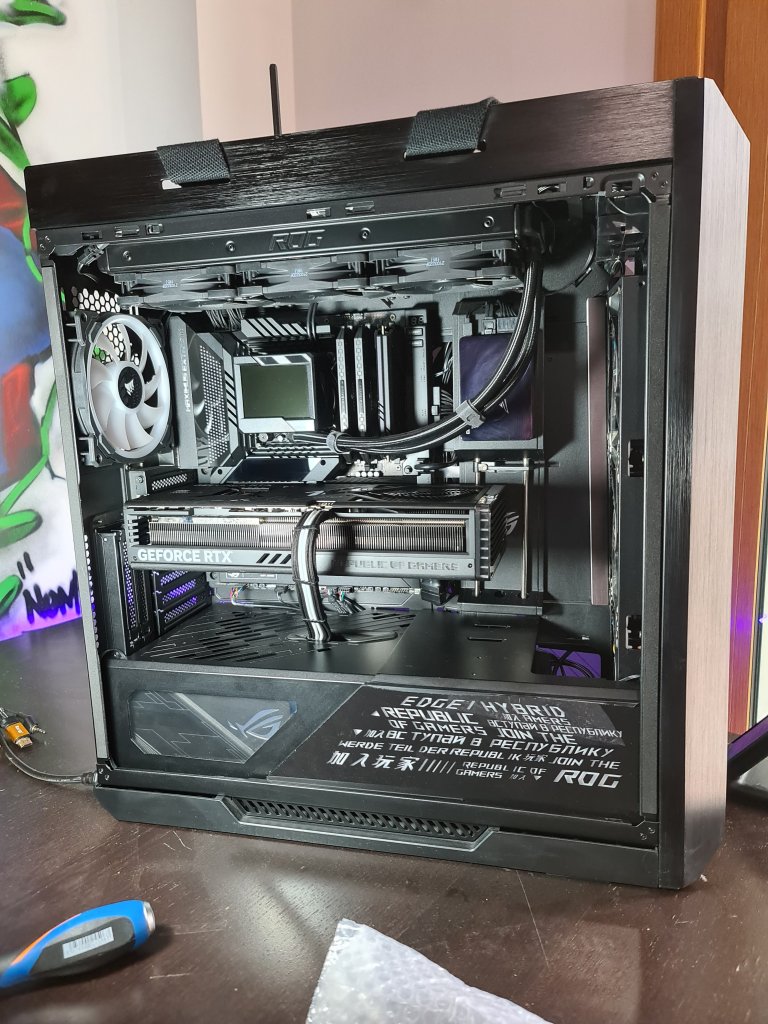
Before trying the outmost position for the 3090, I decided to try placing it closer to the motherboard again. Thanks to the extender the L shaped cable was no longer interfering and I could always try removing the small OLED screen that doubled up as a NVMe drive cover.
Much to my surprise, that ended up not being necessary. The top edge of the 3090 still rubbed against it, but the real problem had been the L shaped cable all along - I was now able to have the best of both worlds, a vertical GPU but without the higher temperatures that come with it being too close to the window. The GPU holder I got from Amazon in case I decided to install the GPU closer to the glass never even got out of the box.
But then I (of course) ran into another problem: the (very expensive) 25 cm version of the
PCI 4.0 LINKUP GPU riser cable, although PERFECT for the position closest to the glass, was now too long to fit snugly behind the 3090 without some seriously tight bends (a no-no for riser cables). I ended up having to order the 15cm version instead (but kept the 25 cm version just in case).
The old PCI 3.0 riser cables will not function properly with the newer PCI 4.0 graphic cards, and because PCI 4.0 riser cables must be of much higher quality to preserve signal integrity at PCI 4.0 speeds, they are also a lot more expensive than their 3.0 brethren.
The CableMod fiascoOn the C700M I was using black & white Cablemod cables to match the overall black & white theme.

These cables were not extensions, but full Seasonic compatible power cables I had ordered from Cablemod back when I still had the 2080 TI and GPUs only required two PCI-E 8 pin cables.
With the 3090 I ended up buying a matching pack of Cablemod extension cables rather than having to wait God knows how long for a new PCI-E 8 pin cable directly from Cablemod (they take a long time to ship custom cables AND the shipping prices would have made that single cable even more expensive than the whole extension pack).
This turned out to be somewhat of a mistake, as power extensions actually reduce the quality of power being delivered (perhaps due to the higher resistance/longer distance power needs to travel).
You see, according to Asus, to fulfill the power demands of the GeForce RTX 3090, three 8-pin power connectors are present, along with an onboard circuit that monitors PSU rail voltage. The circuit is fast enough to catch any transients that result in the rail voltage dropping too low. If that happens, a red LED will light up to indicate a power supply issue.
Sometimes while playing a demanding game the LED of the connector with the extension cable would start blinking red (but not the others). This never resulted in any (visible) issues, but it proved how using an extension cable can actually degrade the quality of power being delivered to the card.
Anyway, when I moved the 3090 to the Helios and the 2080 TI back to the C700M, I didn't want to remove those nice Cablemod cables from the C700, so I decided to order some more.
Alas, the Cablemod site said they were experiencing weeks long delays due to restructuring etc, so I ended up ordering a
Seasonic-compatible Cablemod kit from Amazon (faster and cheaper).
I failed to read the reviews and this turned out to be another mistake: despite how long the 30 series GPUs have been out, these kits are still designed for the 20 series - the 3rd 8-pin PCIE cable is missing (although you wouldn't notice that just by looking at the pictures for that kit).
So, I was back to using an extension cable for one of the 3090 power connectors. Worse, with the three separate cables plus having to fit them all through the top aperture on the PSU cover, I couldn't get them to align properly and the result looked really, really, bad:

I still tried routing the cables behind the card but, since the ModMesh cables are very thick, that turned out to be a no-go (not to mention they would be mostly hidden behind the card, so what was the point?).
I ended up completely giving up on the idea of using the Cablemod cables and went back to the black cables that came with the ROG Thor.
Setting up the all important RGBBeauty is, as always, in the eye of the beholder, but being the creator of Windows customization software I am - not surprisingly - a fan of a few lights here and there (although NOT so much rainbow puke).
Besides, we all know RGB makes your system 50% faster.
The Helios case, the Strix 3090 and the Asus Z690 Extreme motherboard are, of course, Aura compatible. The problem is that Asus seems determined to piss everyone off by bundling great hardware with utterly trash software.
The older Win32 stand-alone version of Aura Sync has been deprecated in favor the monolithic Armoury Crate and can no longer be used to control the latest 30 series of Asus graphic cards. Even when it was still available - despite Asus having had YEARS to develop the damn thing - it still could not do BASIC tasks such as having different RGB effects for different hardware. The best it could do was display different SOLID colors for each motherboard zone, RGB header, etc...
With Armoury Crate Asus is trying to unify EVERYTHING into a single piece of software (adding everything to it plus the kitchen sink). Personally I think this is a HUGE mistake, especially given that Armoury Crate is a UWP app. It's slow, EXTREMELY bloated, inefficient, consumes a TON of memory - I've seen one of the 6 (!!!) different asus_framework.exe instances that are currently running on my system use up to 1.5GB of RAM! - and literally spreads out into your system like cancer.
To give you an idea, Armoury Crate is not even open but despite this I have AT LEAST 25 (!!!) Asus/Armoury Crate related processes and services currently running on my system (including 5 instances of ArmouryWebBrowserEdge, 6 instances of ASUS NodeJS Web Framework, plus 32 bit and 64 bit versions of AAcKingstonDramHAL when I don't even have Kingston RAM installed on my system).
There is no standalone streamlined Win32 application to control just my Asus Ryujin II AIO either. If I want to control it I have no choice but to install Armoury Crate. Likewise if I just want to change some colors.
This is so bad that to uninstall Armoury Crate you MUST run their own standalone uninstaller utility, which, to make matters worse, seems to be version specific. Fail to do this, try to uninstall Armoury Crate as you would any normal application via the Windows Apps & Features page in Windows Settings, and you might as well get ready to reformat your system: it will NEVER work right again after that.
And to make things even more laughable, Aura Sync in Armoury Crate has even LESS functionality than the old Win32 Aura Sync: now EVERYTHING must display the same color and effect (except some devices like the Strix 3090 that allow you to optionally control them individually, but those are the exception and not the rule).

You can no longer distinguish between different motherboard zones, individually control different RGB and ARGB headers on the motherboard, etc... In other words, not only does Asus now force you to install a crap ton of bloatware into your system, as that software has EVEN less functionality than the - already lacking in BASIC functionality - old Win32 Aura Sync.
Plus it keeps FORCING you to update it, and the update often ends up breaks existing functionality that was previously working fine - and it does not let you go back to the previous version. A total mess.
I don't remember ever seeing a piece of software so universally disliked. But does Asus listen to their customers? Nah. Of course not.
As I mentioned a thousand times previously, in my experience the only RGB controlling software that is actually worth installing on your system is Corsair's iCue (and no, they are not sponsoring this
).
With iCue each different piece of hardware can be controlled individually and you can mix and match colors and effects to your heart's content, even add them on top of each other. Not only that, and unlike what happens with Armoury Crate whenever you have anything more complicated than a solid color, CPU usage is pretty much negligible, even when using extremely complex RGB effects.

There is one problem though: it only works with proprietary Corsair hardware (and yes, I am aware of the Asus plug-in, but that requires Armoury Crate to be installed, does not support ARGB headers and the plugin often breaks when Armoury Crate updates itself).
The fact that iCue is very near perfect is one of the reasons why I wanted Corsair DDR5 RAM, so I could control it with iCue.
What you may or may not know is that there is actually a way to make Aura Sync compatible hardware (such as led strips, fans, even the ROG Thor PSUs and the Helios case itself, etc...) work with iCue.
In order to do that you first need to buy an Aura (3 pin ARGB) to iCue cable adapter like this one
HERE.
Instead of connecting the Aura compatible hardware directly to the motherboard ARGB header, you connect it to the adapter cable. The other end of the cable then connects to a Corsair Lightning Node Pro, like this:

In the Helios, Armoury Crate would control the motherboard, the AIO and the Strix 3090 (the latter two can actually be controlled individually, but not the motherboard ARGB headers and built-in LED strip, which I was going to set to neutral white).
My idea was to use iCue to control the Corsair Dominator Platinum RAM, the Corsair LL140 fan at the back of the case and a couple of Corsair LED strips (plus my Corsair K95 keyboard and Polaris mousepad, of course). Furthermore, with the cable adapters I wanted to see if it was possible to also use iCue to control the RGB in the ROG Thor PSU, the T-Force SATA SSD, and even the Helios case itself!
I ordered 4 of these adapter cables (or two packages, each package coming with two cables). Note, however, that the Lightning Node Pro is obviously NOT included, only the cables themselves.
Unfortunately each Lightning Node Pro only has two ports. I was already using one Lightning Node Pro to control the LL140 fan at the back of the case and the Corsair LED strips. To control the rest I was going to need more Lightning Node Pros - and since iCue controls each of these via a USB 2.0 header on the motherboard and the Z690 only has two which were already in use, I was also going to need a USB 2.0 hub.
I ended up ordering a
Nzxt Internal USB 2.0 Hub from Amazon:

Please note that there are a TON of cheaper USB 2.0 splitters available on Amazon, but most of these apparently do not share all signal lines. As a result, the hardware will light up but iCue will not recognize that a Lightning Node Pro device is connected to it. The NZXT hub already does the job properly, plus it comes with small rubber caps to cover non-used ports, so that the metal pins are not exposed.
With all these hubs, fan controllers, lightning node pros, etc, cable management at the back of the case ended up suffering greatly
(and you can't even see the two other Lightning Node Pros plus the Corsair fan hub for the LL140 that are tucked away deep inside the PSU compartment eheh):

So many hubs and controllers, in fact, each requiring its own independent power, that I ran out of SATA power connectors and had to order a couple of
SATA Y splitter cables.
Aura Sync vs. Corsair iCueSo, since I want the led strip alongside the Z690 motherboard to be white and in Armoury Crate I cannot individually control the ROG Thor PSU, this would result in an all white ROG logo (as you can see in the photo below taken when I was still using the black & white cablemod cables).

If you leave the Thor's RGB cable unconnected, the Thor defaults to solid red (look around for videos displaying systems with the ROG Thor and this is what you will see mostly). If you go to the
ROG Thor product page on the Asus website, however, you will notice that the diagonal stripe actually features a nice blue to red transition:

I wanted to reproduce this, but without the ability to control individual RGB headers on the motherboard (much less address individual LEDs), you simply cannot do it using Armoury Crate.
Likewise for the pattern on the glass at the front of the Helios case: you either use one of the case's built-in RGB effects, or you get whatever effect/color is provided by Armoury Crate (which in this case would have been solid white). Most people default to using the color wave effect (see below), but I wanted something static based on white but not all solid white.

Finally, if you look at the side photo of the Helios above where the ROG Thor PSU is white, you should notice that the cool letters and symbols on the side of the PSU cover are mostly not visible in the dark even with a LED strip just below it. This is because of the way the PSU cover attaches to the case and the spacing in between.
To try and work around this I ordered a
custom made ARGB Helios PSU cover side panel from AliExpress. The Chinese have a TON of different panels for the Helios with lots of different patterns: I chose a pattern that only displayed the letters and symbols, like in the actual PSU cover.

I was very surprised that it only took a week and a half from ordering to the panel arriving at my doorstep.
Most examples of these panels for the Helios on the net show them using rainbow puke, but all I wanted was the possibility of lighting up the letters and symbols in white, so they could actually be seen.
With three Lightning Node Pros (remember each Lighting Node Pro only has two ports) and the four Aura to iCue cable adapters, I could thus use iCue to control the LL140 fan at the back plus a series of Corsair LED strips going around the case with the first one, the ROG Thor and the Helios front panel with the second, and the side panel and the T-Force SATA SSD with the third.
With iCue allowing me to address leds individually, I managed to get the effect I wanted for the ROG Thor (photo doesn't do it justice though and the glass reflections don't help either; the red looks pinkish but I can assure you it's red in real life and the diagonal stripe begins with a bluish accent):

As for the front panel, again addressing leds on an individual base I managed to get the bottom pattern white and the actual ROG logo red:

Below you can see better the end result, with the side panel letters lit white. The panel is REALLY bright, so even though I set it to solid white I could not have used Armoury Crate, it would have been too bright and deviate all attention from the rest of the case! With iCue I managed to make it much darker and thus a bit more sober:


Unfortunately even with the Aura to iCue adapter cable I was not able to control the RGB in the T-FORCE SATA SSD. This is because it uses some kind of micro-USB cable to Aura connector instead of a simple Aura 3 pin ARGB cable, so it refuses to let itself be controlled by iCue.
In the end I prefer that weird mix of red and green it defaults to (guess the blue channel went belly up after being solid white for so long in the C700M) than a "white" that by now is actually a dark shade of puke yellow. As it is it kind of matches the colors of the AIO and the motherboard's Anime Matrix LED displays.